
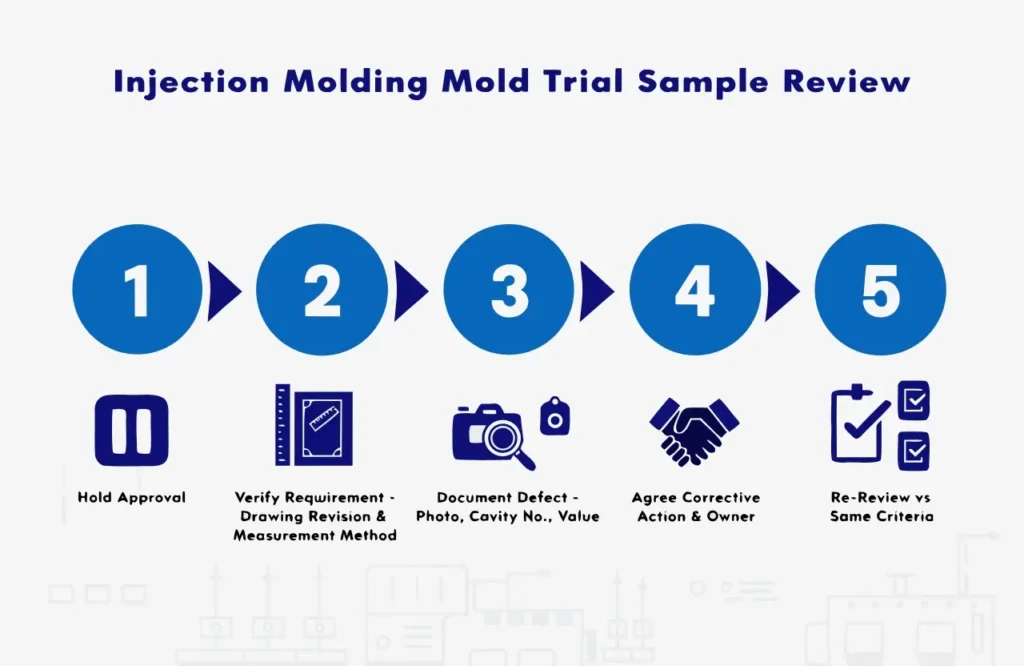
When a mold trial sample comes back and it does not meet what you expected, you have a fixed sequence of steps that keeps the project moving without turning a normal correction cycle into a dispute. Hold the relevant production approval until the issue is settled.
Verify the requirement you are measuring against, including the drawing revision and the measurement method. Document every defect with a photo, a cavity number, and a measured value. Agree on the corrective action and who owns it. Then review the new samples against the same criteria the first ones were judged against.
This article walks through each of those steps for injection molding sample review, and gives you a working issue log you can copy for your own project.
Why sample disputes actually happen
Most sample disputes are not caused by a factory ignoring the problem. They come from a mismatch between what the buyer thought was agreed and what was actually written down. If the trial ran without a written record of which surfaces are cosmetic, which dimensions are critical, and what appearance standard applies, you and the supplier are working from different versions of "acceptable."
Your strongest position in that conversation is not frustration. It is a documented mismatch: this feature does not meet the drawing revision we signed off on. If nothing was signed off in writing, the first job is not to argue about this sample. It is to agree, in writing, on the standard the next sample will be measured against.
Confirm which trial stage the sample is from
T0, T1, and T2 terminology varies between suppliers. Some factories use T0 for the first shot off a new tool with no process development. Others use it for the first fully dimensional sample. Ask the supplier which definition they follow and confirm the trial scope in your PPAP or APQP paperwork before you judge the parts.
The point is not the number. It is what was agreed for that trial. A first shot meant only to prove the tool fills is not judged against production dimensional tolerances. A sample submitted as a production candidate is. Match your criticism to the scope the supplier signed up to deliver.
Preference or failure
Before you write your first comment, separate preference from failure.
A preference is a buyer wanting a slightly glossier finish, a color closer to a swatch, or a cleaner gate mark, when none of those were specified in the drawing or acceptance criteria. Preferences are negotiable. A supplier is within their rights to quote extra time or cost, or to decline, if the item was not called out earlier.
A failure is a dimension outside the drawing tolerance, a feature that does not function (a snap that does not engage, a boss that strips under a screw), a warped part that will not assemble, or a cosmetic defect that fails an agreed appearance standard. Failures are grounds for rejection.
Mixing the two in one email causes real delays. Keep the list separated so the supplier can see which items are must-fix and which are optional.
Cover all five factors when you assess a defect
A defect can come from any of five sources, and often from more than one at the same time. Do not assume the cause before you look.
Part design. Wall thickness variation, sharp corners, insufficient draft, or ribs that create sink can trace back to the geometry itself. Thin walls are not automatically a tooling problem. Sometimes the design is asking the material to do something it cannot.
Tooling. Gate location and size, venting, cooling layout, ejector placement, and cavity condition. A short shot on one cavity but not another usually points here.
Processing. Melt temperature, injection pressure, holding pressure and time, cooling time, back pressure, screw speed. Process issues can often be corrected without opening the mold, but they still cost trial time, inspection time, and cycle time to sort out.
Material. Resin grade, moisture content, colorant loading, regrind percentage, batch variation.
Measurement. Which instrument, on which fixture, with which datum reference. Two labs measuring the same part with different setups will get different numbers. This is not a defect in the part, it is a defect in the measurement plan.
A recurring defect does not automatically prove the tool or the design is wrong. It proves the current corrective action is not addressing the real cause. That could still be process or material, if those variables have not been controlled tightly enough between trials.
Color, gloss, and gate marks are valid rejection reasons when they fail an agreed appearance standard, such as a limit sample, a boundary sample, or a color chip referenced in the drawing. They are not valid rejection reasons when no standard was set.
If a sample fails an agreed specification, do not start by changing the spec
When a measured value falls outside the drawing tolerance, the first step is not to loosen the tolerance. The first steps are:
- Verify the drawing revision the supplier trialed against is the current revision.
- Verify the measurement method: datum reference, instrument, fixture, and part conditioning.
- Investigate the nonconformity across the five factors above and identify the probable cause.
- Correct the nonconformity through a process change, a material control, or a tooling modification, and retrial.
Changing the specification is a separate path. It requires engineering review on both sides and written customer approval, usually through a deviation request or an engineering change notice. It is used when the investigation shows the drawing itself is wrong or unrealistic, not as a shortcut when a sample fails.
Send evidence, not a complaint
Photos and measurements make the difference between a corrected sample and a repeated one. What the tooling engineer needs from you:
- Clear photographs of each defect, with a feature or callout number that ties back to the drawing.
- Measurement data, not adjectives. "0.42 mm over the 6.00 +/- 0.05 mm callout on feature 12" beats "it feels loose."
- The cavity number the sample came from. A defect in cavity 3 only can be a completely different problem from the same defect across all cavities.
- The trial number or sample round the part is from, so there is no confusion later about which version was accepted or rejected.
If acceptance criteria were agreed before the trial, refer to that document directly. Comparing the sample to a signed criteria sheet is a stronger position than comparing it to a general sense of what the part should look like.
Reconcile conflicting measurements before you argue about the part
If you and the supplier are getting different numbers on the same feature, the measurement setup is the first place to look, not the part.
Datums. Both sides must measure from the same reference features called out on the drawing. Measuring from a different edge changes the number, not the part.
Fixtures. A part held one way in one lab and clamped differently in another will read differently, especially on thin-walled or flexible geometry. Agree on how the part is held before it is measured.
Instruments. A CMM, a vision system, calipers, and a hand micrometer will each give a slightly different reading on the same feature. Agree on the instrument class before the trial.
Conditioning. ASTM D618 describes conditioning practices for plastics and electrical insulating materials, but the applicable condition and measurement timing must match the resin, drawing, customer requirement and test method. Record temperature, humidity and elapsed time so buyer and supplier data are comparable; do not cite the standard as one universal conditioning recipe.
When results still disagree after datums, fixtures, instruments and conditioning are aligned, run a measurement-system study suited to the data and feature. A Gauge R&R study can quantify repeatability and appraiser variation, but its design, part range and acceptance interpretation should follow the customer’s quality method; it is not an automatic verdict on the molded part.
What the supplier should send back
A supplier taking the issue seriously will come back with more than "we will fix it." Expect:
- A probable cause, not just an acknowledgment.
- The proposed correction and its category. A process change (melt temperature, holding pressure, cooling time) usually carries no tooling cost but still costs trial time. A tooling change (gate resize, added venting, steel-safe adjustment) takes longer and often involves cost, and a weld-and-recut is a bigger commitment than a steel-safe modification.
- A revised sample plan that names what will be produced next and what specifically will be checked on it.
If the answer is "we will try again" with no explanation of what changed, expect the same defect on the next round.
A sample issue log you can copy
Keep one running log for the project. A spreadsheet is enough. The columns below cover what most trial reviews need, and give you a written trail if the project runs to three or four rounds.
| Drawing rev | Trial | Cavity | Requirement | Actual | Photo | Proposed action | Owner | Due | Closure evidence |
|---|---|---|---|---|---|---|---|---|---|
| Rev C | T1 | 2 of 4 | Boss OD 6.00 +/- 0.05 mm | 5.87 mm | IMG_014 | Increase pack pressure 8%, retrial | Supplier process eng. | 12 Oct | T2 CMM report, 5.99 mm |
| Rev C | T1 | All | Gate vestige within 0.3 mm limit sample | 0.6 mm proud | IMG_022 | Trim gate insert, steel-safe | Supplier tooling | 20 Oct | T2 visual vs limit sample |
| Rev C | T1 | 1 of 4 | Cosmetic A-surface, no sink | Sink over rib intersection | IMG_031 | Extend cooling time; if unresolved, review rib design | Joint | 15 Oct | T2 photo, sink resolved |
The rows above are illustrative examples, not actual CKMOLD trial data.
Whatever format you use, keep it in one place, not scattered across email threads. A single running log makes it easy to see patterns: for example, the same feature failing across two rounds after two different process fixes, which points toward a design or tooling cause rather than process.
When to ask for a new trial and when to accept a deviation
Not every rejection requires a full mold trial. Decide from the defect’s function, cause and correction: a documented visual concession may need only controlled disposition; a tool or process change may need targeted samples; a change that affects multiple cavities, dimensions or assembly interfaces may justify a broader trial and revalidation.
The trap is accepting a sample to protect the schedule without writing down what you accepted and why. When you approve a deviation, record it the same way you would any other design change: what the deviation covers, why it was approved, whether it applies to this batch only or forward, and who signed off.
Keep the three approval states separate
Sample review sits inside a bigger approval chain, and mixing the states causes confusion later.
Limited development approval. You are approving the sample only for the next step, such as pilot assembly or a customer functional test. It is not permission to run production.
Approved deviation. A specific out-of-spec condition is accepted for a defined quantity or time window. The drawing does not change. Anything outside the deviation still fails.
Production release. The buyer authorizes the defined production stage after the required drawing, process and validation evidence is complete. PPAP-level approval applies when required by the customer or industry program; other projects may use a first-article, pilot-run or customer-specific release package.
Each of these needs its own document, its own quantities, and its own expiry. A deviation does not become a production release because the parts shipped.
Commercial questions to settle in writing
When a sample fails, someone pays for the correction. Whether that is you or the supplier depends on the root cause and what was quoted, so it is worth working through against the original quotation and purchase order (PO):
- Who covers the corrective work on the tool. A supplier-caused defect is normally on the supplier. A change driven by a design revision from your side is normally on you.
- Who covers additional trials, extra inspection, replacement samples, and freight for shipping revised samples.
- What gets rechecked after a modification: the specific feature that was corrected, plus any adjacent feature or assembly interface that the change could affect. Do not sign off only on the fixed feature and assume the rest is unchanged.
- Whether the trial timing pushes the production release date, and whether that has any downstream commercial impact.
Settle these before the corrective work starts, not after the invoice arrives.
Red flags in how a supplier handles the rejection
Watch for these when the response comes back:
- The email describes a corrective action but not a probable cause.
- The supplier pushes for sign-off without addressing the defects you flagged.
- No change to the process sheet or the corrective action log.
- The next round of samples comes back with the same defect and no explanation of what changed since the previous trial.
A supplier who can explain what went wrong and what they did about it is a better supplier than one who quietly reruns the trial and ships another set.
Common mistakes to avoid when rejecting a sample
- Discussing the defect over voice or chat without writing it down anywhere.
- Not naming the specific dimension, feature, or callout that failed.
- Not naming the cavity the failure came from, on a multi-cavity mold.
- Passing a sample "with reservations" without writing down what those reservations are.
- Treating a preference as a failure, or a failure as a preference, without checking the drawing.
- Rejecting a T0 sample against T2 criteria the supplier never agreed to meet.
The short version
Confirm the trial stage before you write your first comment. Separate preference from failure. Consider all five factors when you assess the defect: part design, tooling, processing, material, and measurement. Send photos, cavity numbers, and measured values instead of adjectives. If the numbers themselves are disputed, align datums, fixtures, instruments, and conditioning before you argue about the part.
Write down what was rejected, what will be changed, who owns the change, and when the next sample is due. Keep the log in one place across rounds. Settle the commercial questions on paper before the corrective work starts. Keep limited approval, deviations, and production release as separate documents.
About CKMOLD
CKMOLD defines dimensions, cosmetic zones, and functional checks with the customer before each mold trial, and records corrective actions and process changes through every sample stage. If you are evaluating a partner for your next tooling project, the CKMOLD mold testing and validation process is a good place to start.