
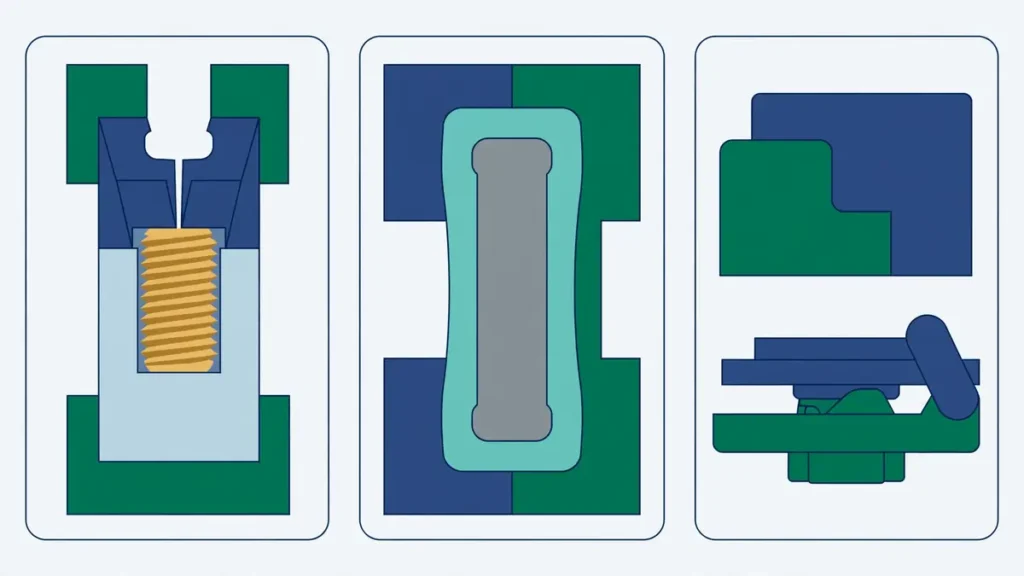
Your part needs a threaded metal insert and a soft-touch grip in the same piece. Or a rigid housing with a sealing lip. Or two colors with no assembly step. Three processes can deliver a multi-material part — insert molding, overmolding and two-shot molding — and choosing the wrong one usually shows up as a tooling bill you did not expect, a bond that peels in the field, or a cycle time that never pays back the mold.
The short answer: start from what the second material has to do. If you need a metal thread, bushing or contact, use insert molding. If you need a soft surface, seal or grip, use overmolding at low to medium volume and two-shot molding at high volume. If you need two rigid colors or materials in one part, two-shot molding is usually the cleanest route — provided the annual volume justifies the tooling premium.
What Does Each Process Actually Do?
The three routes all end with one finished part, but they get there differently.
Insert molding places a pre-made component — usually a metal threaded insert, bushing, pin or contact — into the mold cavity before injection. Plastic is molded around it in a single shot, and the insert becomes part of the finished piece. The insert can be loaded by hand or by robot. Protolabs recommends evaluating insert molding for almost any part that contains a threaded hole, and notes that brass inserts are common, with steel and stainless steel also available.
Overmolding molds a second material over a substrate that was molded first. The substrate is made in one mold, then placed — by hand, robot or rotary table — into a second mold, where the overmold material is injected over it. The two materials bond chemically, mechanically, or both. Xometry describes overmolding as plastic molded over another molded part, typically to add grip, a seal or a second color.
Two-shot molding integrates both materials on a multi-component press. Depending on the tool, a rotating or indexing fixture transfers the first shot to a second station, or a core retracts to open the second-shot space. Compared with off-line transfer, the machine controls substrate positioning and timing. Confirm the proposed mold arrangement, handling and cycle at the quoted cavity count.
| Route | Second material | Tools needed | Cycle | Typical use |
|---|---|---|---|---|
| Insert molding | Metal insert, pin, bushing or contact | 1 mold + insert pockets | 1 shot + insert loading time | Threads, bearings, electrical contacts |
| Overmolding (sequential) | TPE, TPU, second rigid plastic | 2 molds on standard presses | 2 shots + transfer and loading | Grips, seals, soft-touch surfaces |
| Two-shot molding | TPE, TPU, second rigid plastic | Integrated tool set and compatible two-component press | Two stages; output depends on indexing and cycle overlap | High-volume grips, seals, two-color parts |
Which Route Fits Your Part? Start from the Feature
The fastest way to choose is to name the feature the second material must provide, not the process you think you want.
| What the part needs | Best first choice | Why |
|---|---|---|
| Threaded hole for repeated assembly | Insert molding | Compare insert pull-out and torque capacity with the specified assembly cycles. |
| Bushing or bearing surface | Insert molding | Compare a separate bearing or insert with a qualified polymer bearing at the actual load, speed and wear condition. |
| Electrical contact or pin | Insert molding | The metal part is the functional element, not a coating |
| Soft grip, cushion or haptic surface | Overmolding or two-shot | A TPE or TPU layer adds grip without changing the structural substrate |
| Sealing lip or gasket | Overmolding or two-shot | Compare the integrated seal with a replaceable gasket on leak performance, assembly time and serviceability. |
| Two rigid colors or materials | Two-shot molding | One cycle, no assembly, no adhesive |
| Metal strength + plastic body | Insert molding | A stamped or machined metal core inside a plastic housing |
| Encapsulated electronics or sensor | Insert molding | Verify insert temperature and pressure limits and test the assembled seal or insulation where required. |
Volume then decides between sequential overmolding and two-shot molding. Two-shot tooling costs substantially more than two single-shot tools, so it only pays when the volume is high enough for the saved handling and cycle time to cover the premium. Sequential overmolding is the default below that break-even point — it uses standard presses and two simpler molds. Our guide to order quantity and repeat batches explains how to put annual volume and repeat orders into the RFQ so the supplier can judge this honestly.
How Does the Bond Hold — and When Does It Fail?
A multi-material part fails at the interface, so the bond deserves more attention than the shape.
Chemical bonding happens when the two materials fuse at the molecular level — the second shot melts the surface of the first just enough for the polymer chains to entangle. It needs compatible chemistry and the right temperature at the interface. Two-shot molding has an advantage here: the second shot lands on a substrate that is still warm from the first shot, with no dust, handling or skin-oil contamination in between.
Mechanical interlocking is the fallback when chemistry alone is not enough. The overmold material flows into undercuts, holes, grooves or around ribs on the substrate and locks in place as it cools. Design the interlock deliberately — do not rely on it as an afterthought when a bond test fails.
Specify the exact substrate and elastomer grades, color and reinforcement. Avient’s GLS overmolding guide describes formulations that adhere to selected polypropylene and engineering resins. The table gives questions for a first trial. Obtain a grade pairing recommendation, then test retained peel or pull strength on the molded interface after the intended conditioning.
| Substrate | Bonding with TPE | Notes |
|---|---|---|
| ABS | Grade-specific | Check the candidate TPE and ABS formulation, color and surface condition. |
| PC (polycarbonate) | Grade-specific | Check adhesion and whether heat or stress affects the selected PC. |
| ASA | Grade-specific | Evaluate adhesion and weathered performance if the part is used outdoors. |
| PA (nylon) | Grade-specific | Agree drying and subsequent service conditioning for the actual PA and elastomer. |
| PET | Grade-specific | Confirm the supplier’s substrate and processing window before specifying pretreatment. |
| PMMA | Grade-specific | Trial the actual formulation and confirm cosmetic and bond acceptance. |
| PP (polypropylene) | PP-bonding grades available | Select a TPE recommended for that PP; compare molded adhesion with the design’s required retention. |
For insert molding, measure pull-out force, torque retention or position according to the feature’s function. Locate and support the insert in tooling throughout injection. Wall and rib changes affect how the finished part retains it and can introduce sink or warpage. Set locating and shutoff tolerances against the insert drawing, flash allowance and actual mold design. Verify that the insert withstands the melt and tooling conditions.
Where flow splits around an insert, review where the fronts meet relative to the service load. Use short shots or filling analysis and load the production-representative part in the relevant direction. Check a gate, vent or local geometry change with the actual grade; adding glass or wall thickness does not establish weld-line strength.
What Does Each Route Cost Over the Program?
Tooling cost and piece cost pull in opposite directions, so judge the route over the whole program, not on the first quote.
| Cost factor | Insert molding | Sequential overmolding | Two-shot molding |
|---|---|---|---|
| Tooling | Modest premium for insert pockets and locating features | Two molds, each simpler | Highest: one integrated mold, two cavity sets, rotary mechanism, dual-barrel press |
| Insert or second component | Inserts must be bought or machined (CNC, die casting or MIM) | Substrate molded in-house | No separate component |
| Cycle time | Loading time per shot, manual or robotic | Two full shots + transfer | One cycle; both shots in sequence |
| Assembly saved | Eliminates fasteners and secondary assembly | Eliminates gluing or assembly of two parts | Eliminates handling between shots entirely |
| Main cost risk | Insert supply and loading time | Handling damage and bond variation between shots | Tooling premium if volume falls short |
Illustrative break-even example
Illustrative program calculation. Assume the integrated two-shot tool costs USD 18,000 more and saves USD 0.35 per accepted part after allowing for handling and cycle cost. Break-even is USD 18,000 ÷ USD 0.35 = 51,429 accepted parts, rounded up across the program. At 20,000 accepted parts per year, that takes about 2.57 years. A USD 0.15 saving requires 120,000 parts; USD 0.60 requires 30,000. Compare the annual forecast and planned program life using order quantity and repeat-batch planning. Include tool maintenance, yield or financing if the quotes differ on those items.
What Should You Put in the RFQ?
A multi-material RFQ fails when the second material is described in one line. Give the supplier the same level of detail for the insert or overmold as for the main part.
| RFQ item | What to specify |
|---|---|
| Insert | Exact insert part number and supplier, or a drawing; material (brass, steel, stainless); knurl or retention feature; CAD file for the insert |
| Substrate | Exact resin grade, color, and any filler; wall thickness at the bond area |
| Overmold material | Exact elastomer grade, hardness scale and target thickness; confirm flow and retention at the thinnest section with the supplier. |
| Bond requirement | Peel or pull-out requirement and how it will be tested; whether a mechanical interlock is acceptable as the primary bond |
| Tolerances | Insert position tolerance; bond-line and shut-off requirements; gate and parting-line locations |
| Volume | Annual quantity and repeat-batch pattern — this decides sequential overmolding vs two-shot |
| Supply | Who supplies the inserts, and who owns the insert tooling if they are custom |
| Inspection | Dimensional report scope, bond test samples, and first-article evidence |
If the insert is a standard threaded insert from a supplier such as PEM, Dodge or Tappex, send the supplier drawing and CAD file with the RFQ — the molder needs the exact geometry to design the pocket. If the insert is custom, say so early: it will need its own machining or casting route, and that lead time runs in parallel with the mold build. Our injection mold services page lists insert molding and overmolding among the processes we support, and the mold testing and validation process explains how T0 and T1 trials are planned and recorded.
What Usually Goes Wrong at Sampling?
Most multi-material problems appear at the first trial, and most are cheap to fix if the RFQ was specific.
- Insert float or shift. The insert moves as plastic flows around it. Check the locating feature, the insert tolerance and the gate position — flow hitting the insert side-on pushes it hardest.
- Flash at the shut-off. The overmold leaks past the edge of the bond area. The shut-off needs a clean steel-to-substrate seal; a worn or mis-sized shut-off shows up immediately as flash.
- Delamination. The overmold peels from the substrate. Check material compatibility first, then substrate temperature and surface condition at the second shot, then thickness — a very thin overmold cools before it can bond.
- Knit-line cracking. A weld line behind an insert opens under load. Thicken the wall locally, move the gate, or change the insert orientation.
- Color or texture shift. The overmold looks different over thick and thin substrate areas because cooling and flow differ. Approve color on a production-representative sample, not on a single plaque.
- Insert damage. A hard insert dropped into the mold can chip a core or cavity edge. Confirm the loading method — hand, robot or fixture — and who is responsible if an insert is mis-loaded.
Frequently Asked Questions
Can I overmold onto polypropylene?
Yes, with a TPE formulated for the selected polypropylene. Ask for a recommended grade pairing, mold a representative interface and test peel or retention after service conditioning. Add a mechanical interlock if the tested interface or failure mode requires it.
Do I need two-shot molding for a soft grip?
No. Sequential overmolding delivers the same grip at low to medium volumes, using two standard molds. Two-shot molding is worth it when the annual volume is high enough for the saved handling and cycle time to repay the tooling premium.
Who supplies the inserts — us or the molder?
Either, but agree it in the RFQ. Standard inserts are usually bought by the buyer or the molder from the insert manufacturer; custom inserts need a drawing, a supplier and a lead time of their own. State who owns the insert and who replaces it if a batch is out of tolerance.
Next Step
If your part combines a metal thread, a soft grip or a second color, send the 3D model and a note on which feature matters most — thread strength, grip, sealing or appearance — with the annual volume. We will review the route, the bond risk and the tooling options, and confirm what the RFQ needs before quoting. Request a quote with your STEP file, 2D drawing, materials, quantities, key tolerances, surface finish and delivery region, or contact us if the design is still taking shape.