
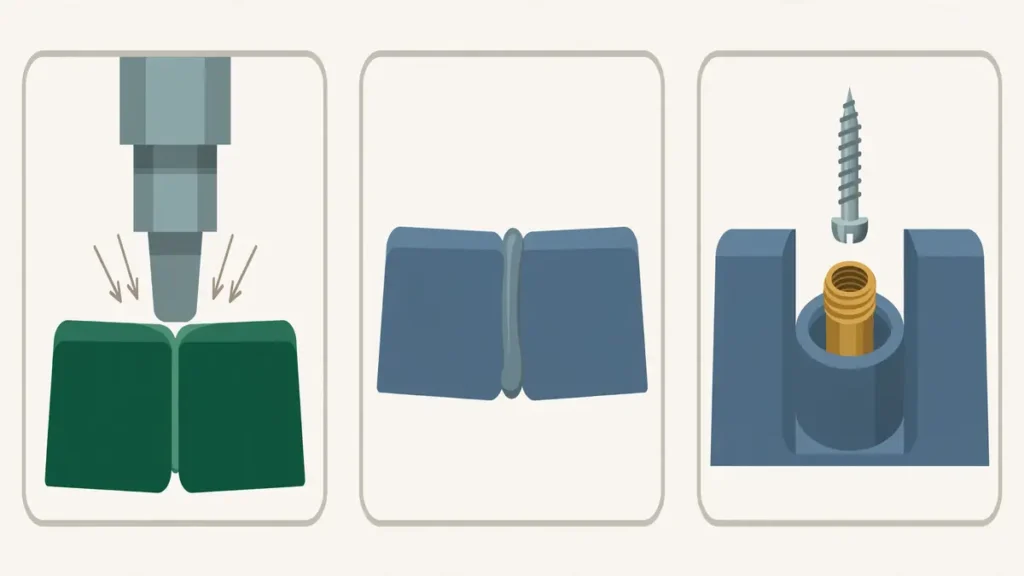
Your injection-molded parts are finished, but the product is not. Two housing halves still have to become one enclosure, a lens has to sit in its bezel, a cover has to stay on through shipping and service. The joining method you choose now decides whether the assembly holds, seals and looks right — and what the mold must contain.
Choose by what the joint must do, not by habit: ultrasonic welding for permanent, high-volume joints between compatible thermoplastics; adhesive bonding for dissimilar materials, large or irregular joints, and a clean appearance; mechanical fastening when the assembly must come apart for service or carry repeated loads — and make the choice before the mold is cut, because each method needs different features in the part.
Snap fit is a fourth option when the joint must be tool-free and fast to assemble.
How Do You Choose Between Welding, Bonding and Fastening?
Start with five questions about the joint itself. Is it permanent, or must the assembly open again for repair, battery replacement or recycling? Are both halves the same resin, or are you joining plastic to a different plastic — or to metal? Must the joint seal against water or dust? Will the seam be visible to the end user? And how many assemblies will you make a year? The answers narrow the choice fast: a sealed, permanent housing in one resin points to welding; a plastic-to-metal joint to bonding or fastening; a serviceable cover to screws.
The table below is the short version of the whole article; the sections that follow give the conditions behind each row.
| Method | Best when | Joint character | Appearance | Can it come apart? | Volume fit |
|---|---|---|---|---|---|
| Ultrasonic welding | Same or compatible thermoplastics, permanent joint, high volume | Strong molecular bond, can be hermetic | Clean seam, small weld flash possible | No — destructive to separate | Best at high volume; tooling cost spreads |
| Adhesive bonding | Dissimilar materials, large or irregular joints, sealing | Stress spread across the whole overlap | Smooth, fastener-free seam | No — destructive to separate | Flexible; fixture and cure time matter |
| Mechanical fastening | Service access, repeated loads, mixed materials | Clamp load at discrete points; inserts carry the load | Visible screws or caps unless hidden | Yes — designed to be opened | Flat per-part cost; little tooling |
When Does Ultrasonic Welding Win — and What Must the Part Design Provide?
Ultrasonic welding joins thermoplastic parts with high-frequency mechanical vibration. A horn presses on the upper part and vibrates — typically at 20 kHz or 40 kHz — while a fixture holds the lower part. The vibration creates frictional heat exactly at the joint interface, the plastic melts there, and the parts fuse into a molecular bond as it cools. Equipment maker Dukane reports that most parts weld in less than one second, and an optimized setup can process more than one part per second — which is why the method dominates high-volume housings and enclosures.
The first condition is material compatibility. The two parts must be chemically compatible in the melt, or they may melt together without forming a strong bond. Dissimilar thermoplastics can work only when their melting temperatures are within about 40 °F (6 °C) and their molecular structures are similar — Dukane gives ABS welded to acrylic as a working example, and polyethylene to polypropylene as a combination that fails despite looking similar. Amorphous resins (ABS, PC, PMMA, PS) weld to each other more readily, while semi-crystalline resins (PP, PE, PA, POM, PBT) usually weld only to themselves. Thermosets cannot be welded at all, because they do not melt and reflow. Check the resin pair first.
The second condition is joint design, and it has to be molded into the part. The most common design is a butt joint with an energy director — a small triangular ridge molded into one mating surface that concentrates the vibration and melts first, spreading molten resin across the joint. For semi-crystalline resins and for joints that must seal under pressure, a shear (interference) joint works better: the parts interfere along a wall as they come together, so melting continues along the whole interface instead of freezing against a cold flat face. Tongue-and-groove and step joints add alignment and hide weld flash. Whatever the geometry, the design needs a uniform contact area, a small initial contact point and reliable alignment — and all of it must be in the tool steel. Review these features in the DFM report before approving the mold, as our guide to reviewing a DFM report before approving an injection mold explains; adding an energy director after the mold is cut means modifying it.
The third condition is a clean, consistent process. Weld quality is affected by mold release agents, lubricants, plasticizers, fillers, flame retardants, regrind, pigments, resin grade and moisture in hygroscopic resins — all factors Dukane lists as affecting bond strength. Tell the supplier about any release agent or additive, and keep regrind content agreed and consistent.
Welding is the wrong choice when the two halves will not weld, when the part is too large or flexible for the horn to reach the joint evenly, or when the joint must open later. It is the right choice for one compatible resin pair, a permanent joint and volume high enough to justify a dedicated horn and fixture.
When Is Adhesive Bonding the Better Choice?
Adhesive bonding uses a structural adhesive — typically an epoxy, acrylic, polyurethane or cyanoacrylate — to join the parts across a bonded overlap. Its defining advantage is that it spreads load across the whole bonded area instead of concentrating it at fastener points. Adhesive maker Henkel (LOCTITE) describes structural adhesives as distributing stress evenly, which reduces stress concentrations and improves fatigue resistance, and notes that bonded joints can exceed the strength of traditional mechanical fastening in some applications. Bonding also joins dissimilar materials, needs no holes, adds no fastener weight, and leaves a smooth seam with no visible hardware.
That flexibility comes with process discipline. Surface preparation is the work: the bond is only as good as the surface it grips, so bonding faces must be clean and free of mold release, and low-energy plastics such as PP and PE usually need a surface treatment or a formulation made for polyolefins — Henkel lists a two-part acrylic made for polyolefin bonding — before they will bond reliably. Bondline thickness must be controlled: too thin starves the joint and too thick weakens it, and the adhesive data sheet states the gap each product is made for.
Time is the other cost. Adhesives have a fixture time and a full cure time, and they are not the same thing. Henkel’s product data illustrates the range: a two-step acrylic can fixture in about 4 minutes, while an epoxy can take about 15 minutes — and full cure takes longer still. Until the adhesive has cured, bonded parts must be fixtured or racked, which takes floor space and handling. Plan the cure into the production flow rather than discovering it at first shipment.
Temperature limits the choice too: a joint that is strong at room temperature can soften in a hot car or a sterilizer. State the highest and lowest temperatures the assembly will see, and confirm the adhesive against the supplier’s data sheet for those conditions.
Bonding fits differing materials, large or irregular joints, clean appearance, or a joint that must seal a gap — and fails when the assembly must open, bond faces cannot be prepared consistently, or the line cannot take fixture and cure time.
When Should You Choose Mechanical Fastening?
Mechanical fastening holds parts together with screws, bolts or rivets, usually into a threaded insert or a molded boss. It is the only one of the three methods designed to come apart. That decides most cases: if the assembly needs service access, battery replacement, adjustment or end-of-life disassembly, fasteners are the default — and the other two methods are out.
Screwing directly into plastic is the cheapest option and the weakest. A thread cut or formed in plastic carries little load and strips a little more every time the screw is removed and reinserted. Protolabs notes that direct threading in plastic is generally weaker than in metal but highly cost-effective for low-load applications, and that a self-tapping screw needs a precisely sized boss with draft on its walls. Use direct threading only for light loads and few removals.
Threaded inserts are the robust answer. A molded-in insert — placed in the cavity so resin flows around it — gives the strongest joint, but adds mold complexity and slows the cycle. A heat-set or ultrasonically installed insert goes into a pre-molded hole after molding and gives good performance at a fraction of the assembled cost; insert maker SPIROL reports that heat-set inserts give the best combination of performance and installed cost, while self-tapping inserts give the best pull-out resistance of any post-mold insert but must be installed square to the hole or they will not mate properly. Our guide to insert molding vs overmolding vs two-shot molding explains the molded-in route in more detail.
Two design rules from SPIROL are worth carrying into the RFQ. First, plastics creep: under a sustained load well below the elastic limit, plastic slowly relaxes and a bolted joint loses clamp load and loosens. A metal insert is not susceptible to creep, so it holds the load path and allows unlimited assembly and disassembly without damaging the thread. Second, size the insert by its job: torque resistance is mainly a function of insert diameter, and pull-out resistance mainly a function of insert length. The boss should be two to three times the insert diameter, the hole deeper than the insert — for self-tapping inserts at least 1.2 times the insert length, for others the insert length plus two thread pitches — and the screw must never bottom out, or the insert will jack out. With filler at 15% or more, widen the hole by 0.08 mm; at 35% or more, by 0.15 mm. Where both halves are plastic, a compression limiter keeps the insert — not the plastic — carrying the load.
Screws also loosen under vibration, so specify a locking washer, thread-locking compound or anti-vibration feature where it applies; and every fastener is a visible feature unless the design hides it, so budget for caps or a hidden location if appearance matters.
What Does Each Method Cost at Different Volumes?
Cost sits in different places for each method, which is why a single unit price misleads. Ultrasonic welding needs a horn and fixture built for the part — a one-time cost — and then each weld costs very little. Adhesive bonding needs a dispensing fixture and floor space for curing, and then each joint costs adhesive plus handling. Screws need almost no tooling, but every assembly pays for the screws and the labor to drive them.
The table below is a hypothetical planning illustration, not a CKMOLD quotation and not a market price benchmark. It models one small two-part housing assembly with four fasteners in the screw case. Assumptions, stated so you can rerun the numbers with your own figures: ultrasonic horn and fixture USD 4,500 one-time, weld cost USD 0.08 per assembly; adhesive dispensing fixture USD 800 one-time, adhesive plus handling USD 0.35 per assembly; screws USD 0.06 each × 4 plus USD 0.30 driving labor, no tooling. Inspection, rework, scrap, adhesive shelf life and horn wear are excluded.
| Method | One-time cost | Cost per assembly | 10,000 units: total | 10,000 units: per part | 100,000 units: total | 100,000 units: per part |
|---|---|---|---|---|---|---|
| Ultrasonic welding | USD 4,500 | USD 0.08 | USD 5,300 | USD 0.53 | USD 12,500 | USD 0.13 |
| Adhesive bonding | USD 800 | USD 0.35 | USD 4,300 | USD 0.43 | USD 35,800 | USD 0.36 |
| Mechanical fastening (screws) | USD 0 | USD 0.54 | USD 5,400 | USD 0.54 | USD 54,000 | USD 0.54 |
Three lessons follow. First, ultrasonic welding looks expensive at 10,000 units and cheapest at 100,000, because the horn and fixture spread across volume — the crossover against screws sits near 10,000 units in this illustration. Second, adhesive bonding is cheapest at low volume because its one-time cost is small, but its per-part cost never falls, so it loses the lead as volume grows. Third, screws cost the same per part at any volume — predictable, but never cheapest at scale — and the table does not count the service value of opening the assembly. Rerun the calculation with your supplier’s quoted figures and your own volumes, changing one input at a time; the shape of the answer matters more than any single number in it.
How Do You Test a Joint Before Approving Production?
A joint is a claim until it is tested. Agree the acceptance tests before production starts, so the first batch is judged against a standard, not a feeling.
| Test | What it proves | Require it when |
|---|---|---|
| Pull or tensile test to failure | The joint’s ultimate strength and failure mode | Every method; the baseline acceptance test |
| Lap-shear coupons (ISO 4587; ASTM D3163 for rigid plastics) | Bond strength on a standard specimen, comparable across adhesives | Adhesive bonding; use it to qualify the adhesive before the joint |
| Leak or pressure test | The joint seals as specified | Any enclosure rated against water or dust |
| Drop and vibration test | The joint survives shipping and service loads | Consumer, automotive and portable products |
| Appearance inspection | No weld flash, adhesive squeeze-out or cracked bosses | Any visible seam or cosmetic surface |
| Dimensional check after joining | The assembly still meets its dimensions | Always — welding collapses the energy director and shortens the stack, adhesive adds bondline thickness |
| First-article + periodic sampling | Production joints match the qualified samples | Every program; agree the sample size and pass/fail rule in advance |
Two details catch buyers out. First, joining changes dimensions: an ultrasonic weld consumes the energy director, so the assembled height is shorter than the sum of the two parts, and an adhesive joint adds bondline thickness — check the assembled dimensions, not just the parts. Second, test the production process, not a hand-made sample: a slow hand-made weld and a one-second automated weld are different joints. Our production injection molding route reconfirms revision, resin and quantity before each run, and production follows the released samples — the joined first articles belong in that same release package.
What Should Your RFQ Say About Joining?
Put the joining decision in the RFQ, not in a later email. The table is a checklist: every row is a line the supplier needs to quote the joint accurately. If you have not decided the method, say so and ask the supplier to recommend one — but give them the joint requirements, not a blank page. The joint design feeds into the tool itself, so if the mold is still being quoted, our injection mold services page describes the DFM, mold build and trial route it follows.
| # | RFQ item | What to state |
|---|---|---|
| 1 | Joining method | Ultrasonic welding, adhesive bonding or mechanical fastening — or ask the supplier to recommend one |
| 2 | Materials of both halves | Resin grade and supplier for each half; note any filler, flame retardant or regrind |
| 3 | Joint locations | Marked on the 2D drawing; which joints are structural, which seal, which are cosmetic |
| 4 | Load requirements | Pull, shear, peel or torque the joint must carry, and in which direction |
| 5 | Sealing requirements | Water/dust rating if any, and the test that proves it |
| 6 | Disassembly | Must the assembly open again, how often, and with what tools |
| 7 | Appearance standard | Visible seam allowed, flash limit, adhesive squeeze-out limit, color match |
| 8 | Annual volume and batch size | Drives the tooling-versus-per-part trade-off in the quote |
| 9 | Acceptance tests and criteria | Pull, leak, drop or lap-shear requirements, sample size, pass/fail rule |
| 10 | Who supplies what | Adhesive grade, fasteners, inserts — supplier or buyer, and who owns the horn and fixture |
| 11 | Joined samples | First-article joined samples required before production release |
| 12 | Handling after joining | Fixture or cure time, racking, packaging — who provides it and where it happens |
If the joint requirements are not yet fixed, the contact page is the right starting point — a short conversation usually settles the method faster than a formal RFQ round.
Conclusion
Joining is a design decision, not an afterthought. Ultrasonic welding rewards one compatible resin pair, a permanent joint and high volume with the lowest per-part cost. Adhesive bonding rewards dissimilar materials, large joints and clean appearance, and asks for surface preparation and cure time in return. Mechanical fastening rewards serviceability and repeated loads, and asks for inserts, bosses and a visible fastener in return. Decide before the mold is cut, write the joint requirements into the RFQ, and test the production joint before release.
To put a joining decision in front of our engineering team, complete the Request a Quote form and send your STEP file and 2D drawing with the joint locations marked, the resin grades for both halves, quantities, key tolerances, surface finish, delivery region and timing — and email your CAD files separately to jerry@ckmold.com. A first response is normally sent within one business day.
Frequently Asked Questions
Can ultrasonic welding join two different plastics?
Sometimes. The two resins must be chemically compatible in the melt, with melting temperatures within about 40 °F (6 °C) and similar molecular structures — ABS to acrylic is a known working pair. Amorphous resins weld to each other more readily; semi-crystalline resins usually weld only to themselves. If the pair is not compatible, choose adhesive bonding or mechanical fastening instead.
Do I have to decide the joining method before the mold is built?
Yes. Each method needs features molded into the part: energy directors and shear joints for welding, bond flanges and controlled gaps for adhesive, bosses and insert pockets for fasteners. Adding them after the mold is cut means modifying it, which costs time and money and rarely produces as clean a joint as designing them in.