
Your TPU parts pop out of the mold, looking pretty good. But are they truly finished? Sometimes, hidden issues or the need for a better look means more work.
TPU parts often leave the mold flexible and functional, but post-processing can decide whether they are truly ready for use. Trimming, annealing, surface treatment, bonding, printing, cleaning and assembly all need to respect the material’s elasticity and surface behavior.
Related CKMOLD resources: injection mold services, DFM analysis, mold design, mold testing and validation, and production injection molding.
Post-processing TPU injection molded parts often involves annealing for improved dimensional stability, surface treatments like painting or printing for aesthetics and durability, and assembly techniques such as welding or adhesive bonding to create the final functional product.
So, the injection molding machine has done its job, and you’ve got a batch of freshly minted TPU components. You might think, “Great, job done!” And sometimes, it is. But often, to get that part from just “molded” to “market-ready,” there are a few more crucial steps. I’ve learned over the years that these finishing touches can make all the difference in performance, appearance, and overall quality. It’s these extra steps, the post-processing, that can truly elevate your TPU parts.
Scope of this guide: The scope here begins after a TPU part leaves the mold: conditioning, annealing, cleaning, surface treatment, bonding and assembly. For upstream tool geometry and ejection decisions, see TPU injection mold design.
Does Injection Molding Generally Require Post-Processing, You Wonder?
It’s a fair question. You’ve invested in a good mold, dialed in your machine. Do you really need to do more? Well, it’s not necessarily a straight yes or no.
Not every injection molded TPU part requires post-processing. The necessity depends heavily on the specific application, the complexity of the part, cosmetic requirements, and whether it needs to be assembled with other components.
- Dimensional Stability & Tolerances: TPU, like any plastic, shrinks as it cools. If your part needs to hold super tight dimensions, or if it’s a bit stressed from the molding process, a step like annealing might be crucial.
- Appearance: Is it a customer-facing part? Then color consistency, gloss level, and freedom from blemishes are paramount. This is where surface treatments shine.
- Functionality: Does the part need to be bonded to something else? Does it need specific markings? Will it be subjected to harsh environments? These functional needs often dictate post-processing.
-
Molding Imperfections: Even with the best process, tiny bits of flash (excess material at parting lines) or gate vestiges (where the plastic entered the mold) might need to be trimmed. Here’s a quick way I think about it for clients like the buyer, who’s making components for consumer electronics where both function and aesthetics are key:
Scenario Post-Processing Likely Needed? My Usual Rationale Simple, internal TPU grommet Rarely Basic function, usually hidden, loose tolerance okay. High-precision TPU seal for a device Often (Annealing, deflashing) Needs exact dimensions, clean edges for sealing. Consumer-facing TPU phone case Often (Surface work) Aesthetics (color, feel), branding (printing), durability. TPU part needing strong bond to metal Yes (Surface preparation) Adhesion is tricky with TPU; prep is key. Complex TPU overmolded handle grip Often (Deflashing, texturing) Clean finish, good grip feel. So, How is TPU Processed Before We Even Think About Post-Processing?
Before we get too deep into fixing and finishing, it helps to quickly understand how these TPU parts are made in the first place. Knowing the main manufacturing route gives context to why some post-processing steps are needed.
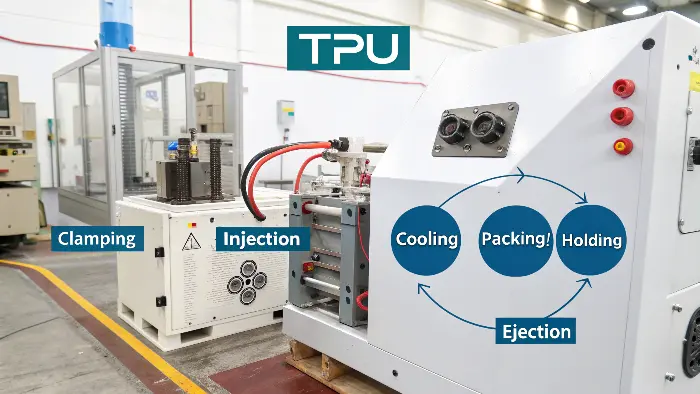
TPU is predominantly processed using injection molding. This involves melting the TPU pellets and injecting the molten material under high pressure into a precisely machined mold cavity where it cools and solidifies into the desired shape.
- Melting & Plasticizing: The dried TPU pellets are fed into the barrel of the injection molding machine, where a screw melts them and mixes them into a homogenous molten state.
- Injection: The screw then pushes this molten TPU forward at high speed and pressure, injecting it into the closed mold cavity.
- Packing & Holding: After the cavity is mostly full, additional pressure (holding pressure) is applied to pack more material in to compensate for shrinkage as it cools.
- Cooling: The mold is cooled (usually with circulating water), allowing the TPU part to solidify. This is often the longest part of the cycle.
- Ejection: Once solid enough, the mold opens, and the part is ejected.
These steps, if not reliably controlled, can introduce issues that post-processing aims to correct. For example, stresses can build up during rapid cooling, leading to a need for annealing. Or the gate, where the plastic enters, might leave a mark that needs trimming. Understanding this main process helps us appreciate why we might need those finishing touches. It’s all connected!Could You Outline the 4 Stages of Injection Molding That Might Affect TPU Parts?
You got it. Knowing these stages helps pinpoint where potential issues that necessitate post-processing for TPU might arise.
The four primary stages of the injection molding cycle are clamping, injection, cooling (which includes packing/holding), and ejection. Each stage has specific parameters critical for TPU that can influence the final part’s quality and need for finishing.
I generally tell the production team, thinking about these stages isn’t just academic; it’s practical troubleshooting. When a TPU part comes out wrong, we walk back through these stages in our minds.
- Clamping: This is where the two halves of the mold are brought together and held shut with immense force. For TPU, especially softer grades, if your clamp force isn’t high enough to counteract the injection pressure, you can get “flash” – thin films of TPU squeezing out at the parting line. Guess what? That flash needs to be removed, which is a post-processing step (deflashing).
- Injection: Here, the molten TPU is shot into the mold cavity. The speed and pressure are critical. Too fast, and you can degrade the TPU through shear heating, causing burns. Too slow, and it might cool before filling the part, leading to a “short shot.” The way TPU flows can also create weld lines or internal stresses. These aren’t generally visible immediately but can affect strength or lead to dimensional changes later.
- Cooling (and Packing/Holding): This is usually the longest stage. As the TPU cools and solidifies, it shrinks. The “packing” or “holding” pressure phase pushes a bit more material in to compensate for this. If cooling is uneven, or if the part has thick and thin sections cooling at different rates (very common!), you can get warpage or sink marks. Internal stresses also get locked in here. This is prime territory for why annealing is so often needed for TPU.
-
Ejection: Once the part is cool enough, the mold opens, and ejector pins push the part out. If the TPU is still a bit too soft, or if the ejector pin design isn’t optimal, you can get pin marks, distortion, or even tears. These might need to be trimmed or smoothed. Let’s put it in a table for clarity:
Molding Stage Key Action Potential TPU Issue Leading to Post-Processing Example Post-Processing Fix Clamping Mold halves close & are held under pressure. Insufficient force leads to flash. Manual or automated deflashing. Injection Molten TPU forced into mold cavity. Flow lines, weld lines, shear degradation, stress. Surface treatment, Annealing. Cooling/Packing Part solidifies; shrinkage compensated. Warpage, sink marks, internal stresses. Annealing, Fixturing during cooling. Ejection Mold opens, part removed. Ejector pin marks, distortion, scuffs. Trimming, Surface smoothing, Annealing. What Specific Post-Processing Techniques Enhance TPU Parts, Then?
Alright, we know why we might need it and how the molding process influences it. So, what are the actual tools and techniques we use to give those TPU parts the final polish or functionality?
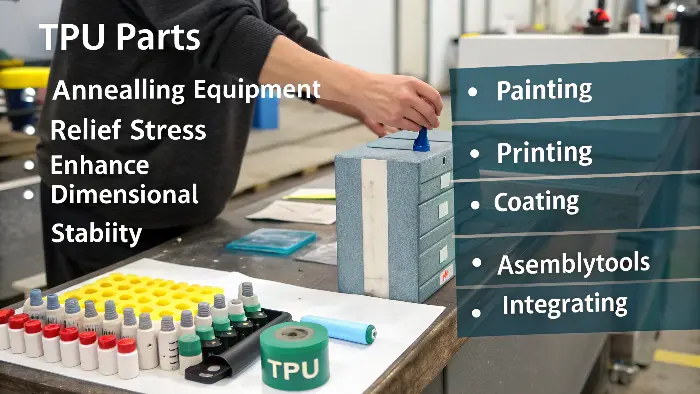
Key post-processing for TPU includes annealing to relieve stress and boost dimensional stability, various surface treatments (like painting, printing, or coating) for aesthetics and protection, and assembly methods if the TPU part is a component in a larger product.
This is where the engineering guidance from years of working with TPU really come into play. We’re moving beyond just getting the part out of the mold to actually perfecting it.
Annealing: The Stress Reliever for TPU
Think of annealing as a spa day for your TPU parts. It’s a heat treatment process done after molding. You heat the parts to a temperature below their melting point, hold them there for a specific time, and then cool them slowly and controllably.
- Why do it for TPU? The biggest reason is to relieve molded-in stresses. These stresses are almost inevitable due to the rapid cooling and pressure changes during molding. They can cause parts to warp or change dimensions over time, especially if exposed to temperature fluctuations. Annealing helps achieve better dimensional stability. It can sometimes even improve certain mechanical properties like creep resistance or compression set.
- How it’s done: Typically, TPU parts are placed in an oven. Temperatures might range from 70°C to 110°C (160°F to 230°F), but this is highly dependent on the specific TPU grade. The supplier datasheet is a practical option here! Soak times can vary from a few hours to even 20+ hours for some critical applications. Slow, controlled cooling is also vital.
A practical approach is to annealing for the buyer’s kind of products – consumer electronics – where a TPU button or seal needs to maintain its precise shape and feel for years. It’s a relatively simple step that adds a lot of reliability.Surface Treatments: Making TPU Look, Feel, and Perform Better
TPU often comes out of the mold with a decent surface, but “decent” might not cut it for a high-end product.
- Painting & Coating: This is common for aesthetics (custom colors, gloss/matte finishes) or functional reasons (UV protection, improved chemical resistance, soft-touch feel). TPU can be a bit tricky to paint because it’s flexible and often has low surface energy, meaning paint doesn’t want to stick. So, proper surface preparation (cleaning, sometimes a primer or adhesion promoter like plasma treatment) is essential.
- Printing & Marking: For logos, instructions, or decorative patterns. Pad printing and screen printing can work, but again, adhesion can be a challenge. Laser marking is often an excellent choice for TPU as it can create durable, precise marks without solvents or inks. I’ve used laser marking on TPU watch bands and cables with great success.
- Texturing (Secondary): While much texturing is done in the mold, sometimes a light secondary texturing process like vapor honing or a very gentle abrasive blast can modify the gloss level or improve the tactile feel.
- Surface Energy Modification: For really tough adhesion challenges (paints, inks, or adhesives), treatments like plasma or corona discharge can chemically alter the TPU surface to make it much more receptive. This was a material change for one of the buyer’s wearable projects where the paint on a TPU strap kept peeling until we introduced plasma treatment.
Assembly: When TPU is Part of a Bigger Picture
Often, a TPU part isn’t a standalone product; it’s a component that needs to be joined to other parts (TPU or different materials).
- Welding: For TPU-to-TPU joints, ultrasonic welding is quite common and effective. It uses high-frequency vibrations to create frictional heat and melt the interface. Heat staking (melting a TPU stud to form a rivet head) and RF (Radio Frequency) welding can also be used for specific TPU types and applications.
- Adhesive Bonding: This is probably the most common way to join TPU to other materials. Success hinges on choosing the right adhesive (cyanoacrylates with a primer, specialized polyurethane adhesives, or some UV-curable adhesives work well) and, critically, surface preparation. Cleaning is a must, and often, a primer or surface treatment like plasma is needed to get a strong, durable bond on low-surface-energy TPU.
- Mechanical Fasteners: Good old screws, rivets, or clips can be used. For screws, you can design self-threading features into harder TPUs, or more commonly, use threaded inserts that are molded-in or heat-staked post-molding. Snap-fit designs are also very popular with TPU due to its flexibility, allowing for easy assembly and disassembly.
Each of these techniques requires its own expertise and equipment, but they open up a world of possibilities for creating complex, functional, and beautiful TPU products.Annealing and Dimensional Stabilization
Some TPU parts may benefit from controlled conditioning or annealing when dimensional stability, stress reduction or assembly performance is critical. The decision should be based on grade, wall thickness and application risk. Overheating can distort flexible parts, so validation is necessary.
Trimming, Deflashing and Surface Handling
TPU flash can be difficult because the material bends instead of breaking cleanly. Trimming methods must avoid tearing, whitening or leaving rough edges. Surface handling also matters because soft TPU can pick up dust, scratches or oils more easily than rigid plastics.
Bonding, Printing and Assembly
TPU can be bonded, printed or assembled with other components, but surface energy, cleanliness and primer choice affect results. Assembly force should be controlled so the part does not stretch, twist or lose sealing function. CKMOLD recommends validating post-processing with real-use tests.
TPU Injection Molded Part Post-Processing Techniques: Buyer Review Checklist
- Confirm whether the TPU grade tolerates annealing or heat treatment.
- Choose trimming methods that avoid tearing or stress marks.
- Clean surfaces before bonding, printing or coating.
- Validate assembly force and long-term deformation risk.
- Inspect post-processed parts for both appearance and functional fit.
FAQ
Do TPU parts generally need annealing?
No. Annealing or conditioning depends on the TPU grade, part geometry, tolerance and application requirements.
Why is TPU deflashing difficult?
Because TPU is flexible and elastic, flash may stretch rather than snap off cleanly, requiring controlled trimming methods.
Conclusion
Post-processing isn’t an afterthought; it’s a vital part of producing high-quality TPU injection molded parts. From annealing to surface treatments and assembly, these steps ensure your components meet all functional and aesthetic requirements. Master these, and you’ll master TPU.